Nanaimo Bars are a delightful Canadian treat that combines rich chocolate, creamy custard, and crunchy graham cracker layers. This no-bake dessert is not only easy to prepare but also guarantees to impress your friends and family. Originating from Nanaimo, British Columbia, these bars have become a beloved staple across Canada and beyond. Whether you are hosting a party or simply craving something sweet at home, this recipe will guide you through making perfect Nanaimo Bars that capture their classic flavors.
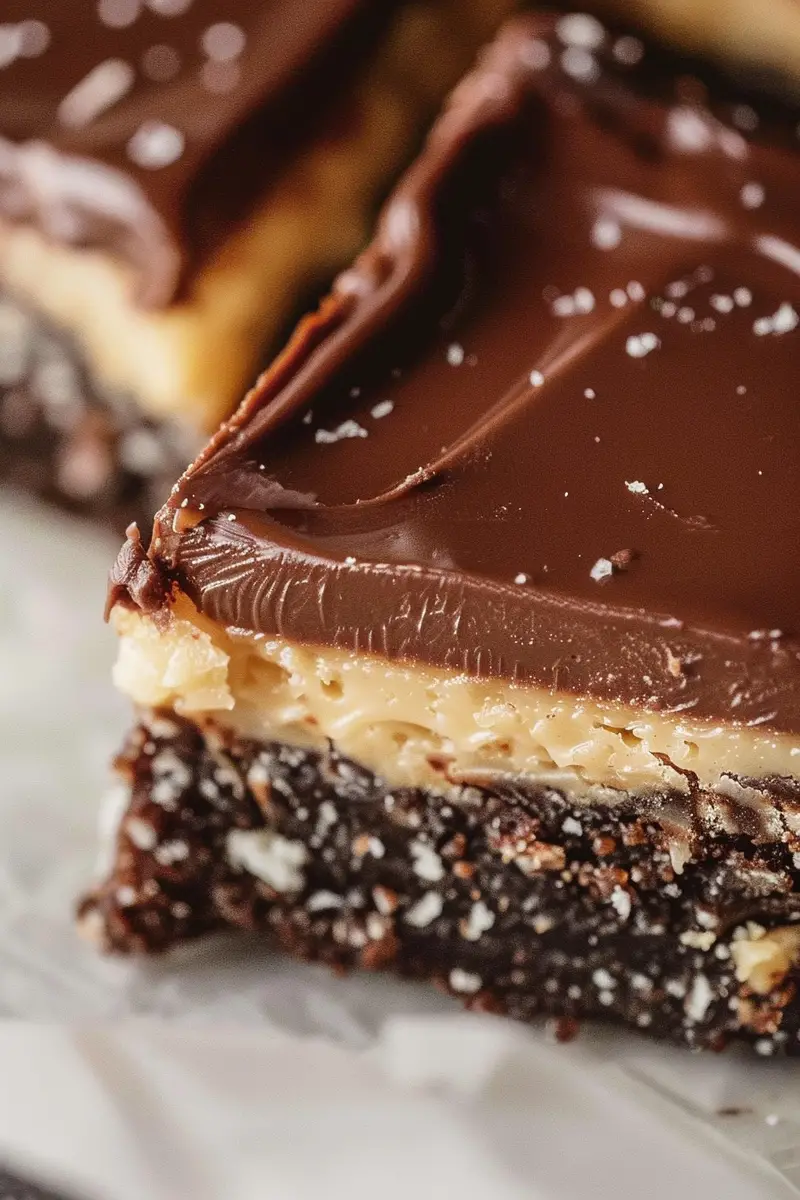
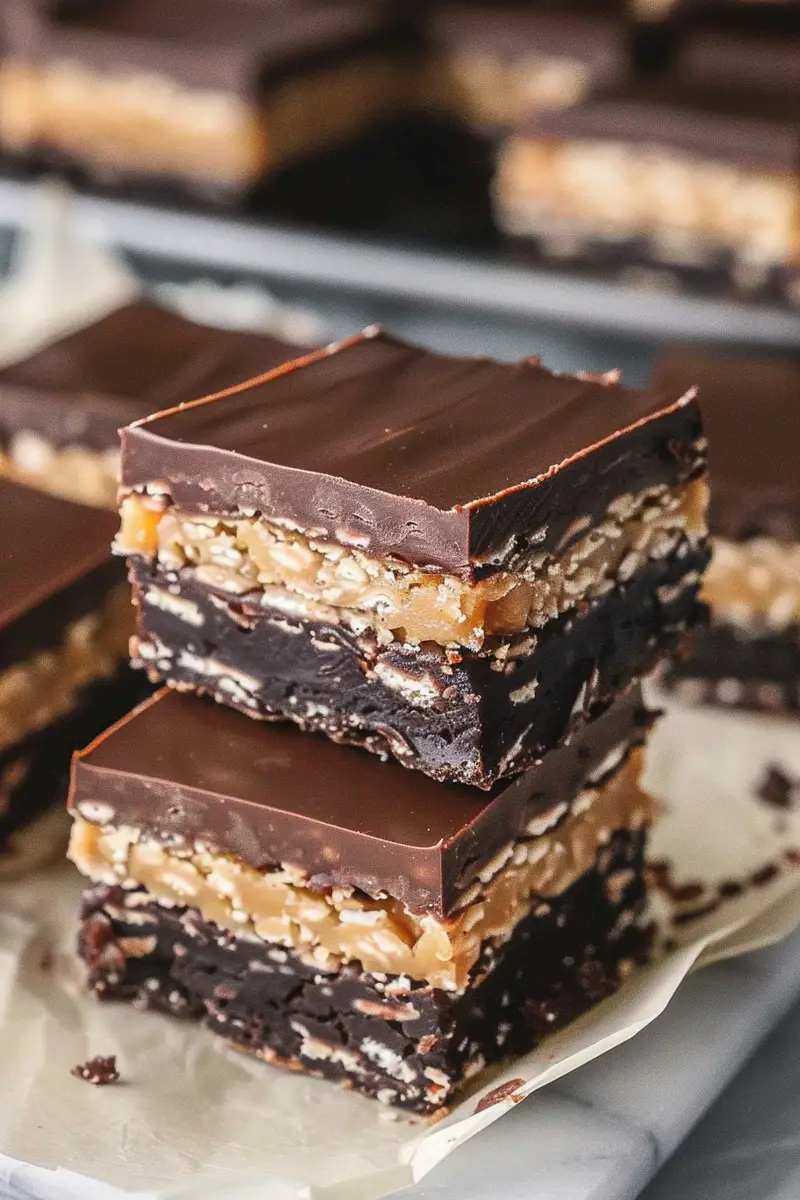
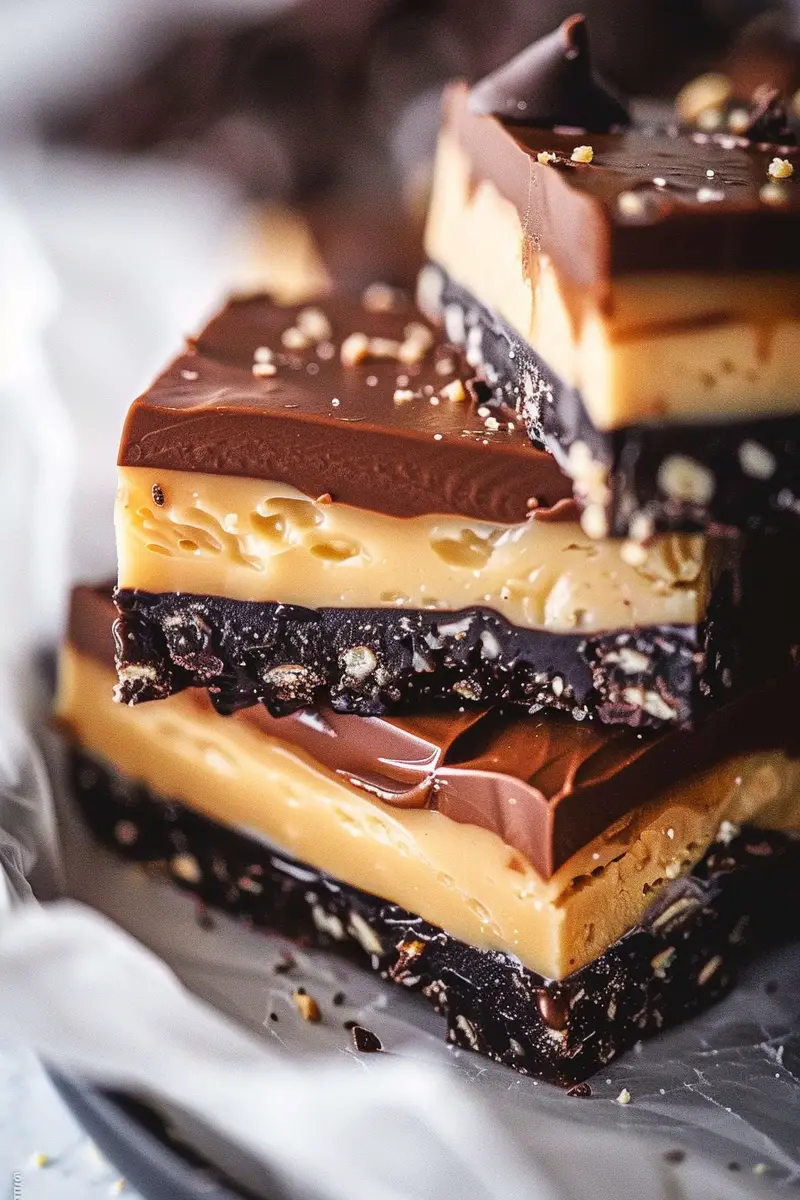
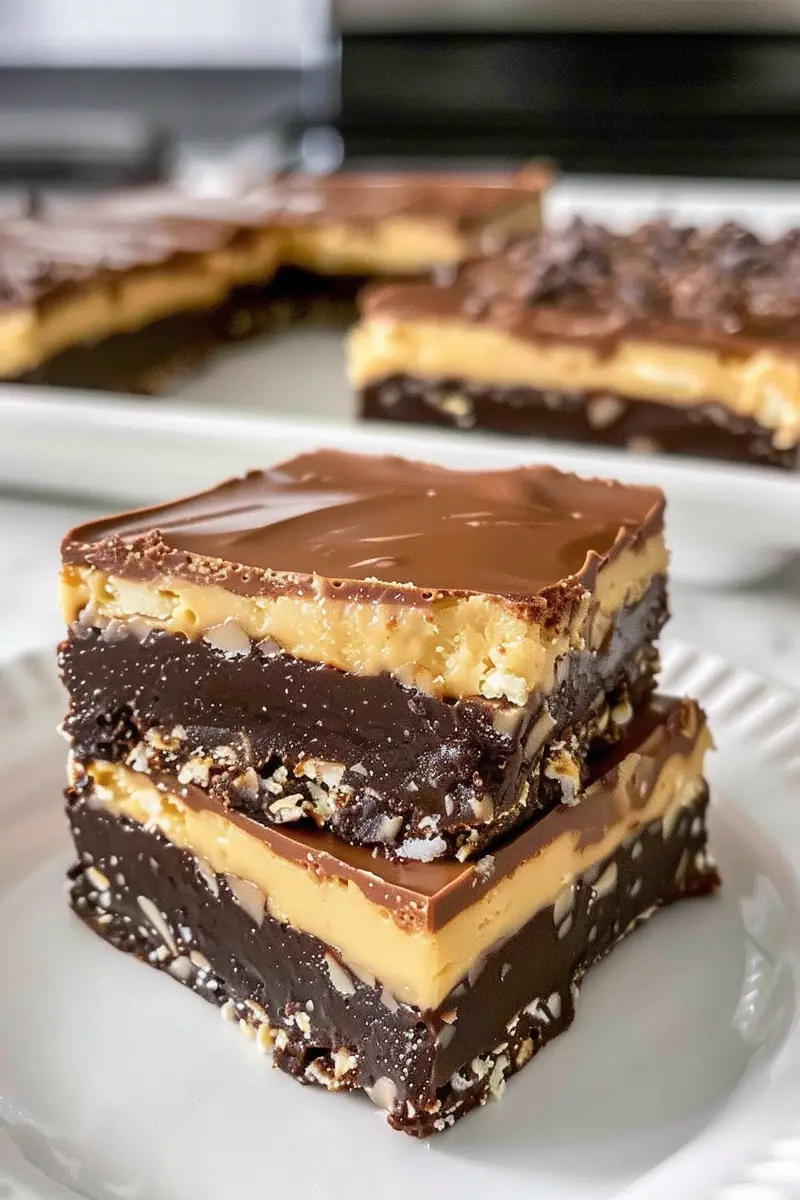
This three-layered dessert features a base made from graham crackers and coconut, a silky custard middle layer, and a smooth chocolate topping. Each bite offers an explosion of textures and flavors that satisfy any sweet tooth. In this article, we’ll explore the main ingredients needed to create these delightful bars, provide step-by-step instructions for preparation, and share valuable serving and storing tips. Follow along to learn how to craft your own batch of scrumptious Nanaimo Bars!
Main Ingredients
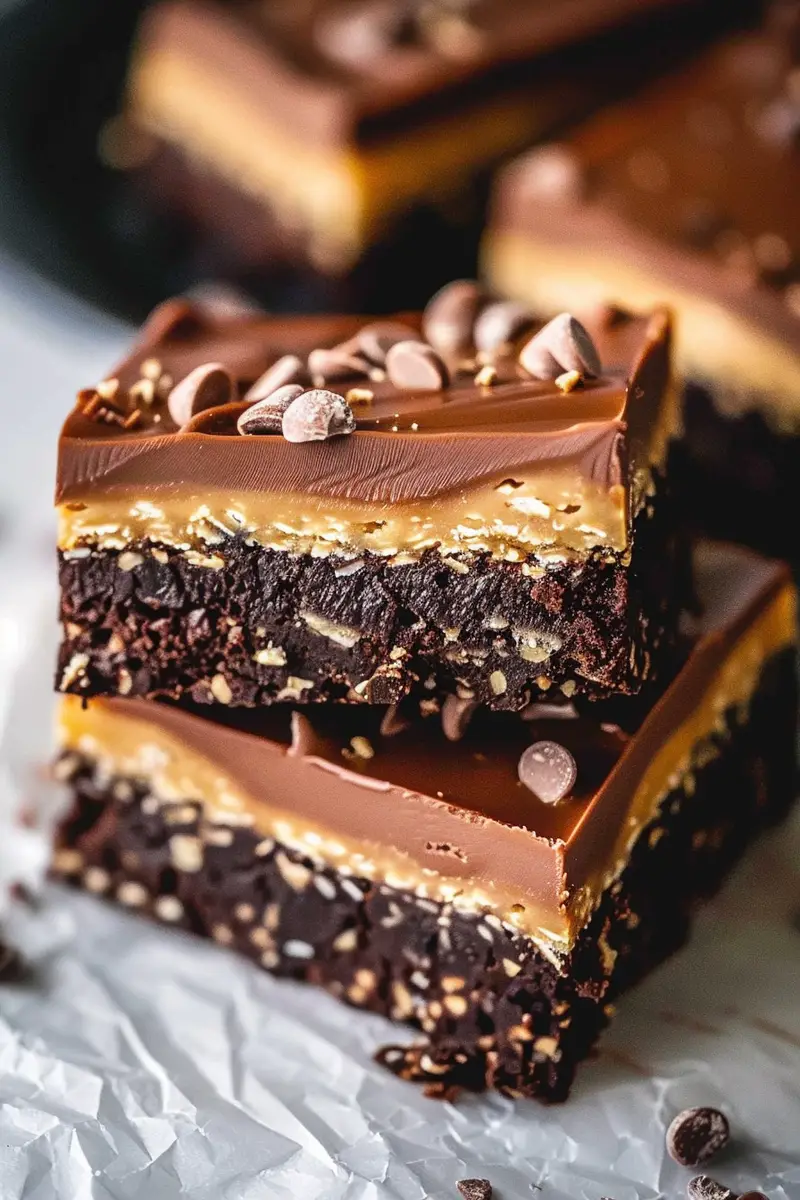
Graham Cracker Crust
The foundation of any great Nanaimo Bar begins with the graham cracker crust. For this recipe, you will need 1 cup of finely crushed graham crackers. The crumbs should be compact but not too coarse; this creates a perfect texture for the base layer. Add 1/2 cup of unsweetened shredded coconut for added flavor and chewiness. To bind everything together, mix in 1/4 cup of unsweetened cocoa powder for richness and taste. Finally, combine all dry ingredients with 1/2 cup of melted butter. This mixture forms a solid base that holds the bars together.
Custard Layer
The second layer is where the magic happens—this creamy custard filling adds richness to the bars. You will need 1 cup of powdered sugar for sweetness along with 2 tablespoons of vanilla pudding mix to achieve that iconic custard flavor. Mix these with 3 tablespoons of softened butter until smooth. Adding 2 tablespoons of milk ensures the filling reaches the desired consistency. The resulting creamy mixture should be spreadable yet thick enough to hold its shape when layered atop the crust.
Chocolate Topping
The final flourish comes from the chocolate topping that crowns your Nanaimo Bars. For this layer, use 4 ounces of semi-sweet chocolate (or dark chocolate if preferred) for deep flavor enhanced by melting it with 2 tablespoons of butter. This combination creates a glossy finish on top that contrasts beautifully with the lighter layers beneath it. Ensure you melt them together gently so they combine seamlessly without burning.
How to Prepare Nanaimo Bars
Step 1: Prepare the Graham Cracker Base
Start by preparing your graham cracker crust as it needs time to set properly before adding other layers. In a mixing bowl, combine 1 cup of finely crushed graham crackers with 1/2 cup shredded coconut and 1/4 cup cocoa powder for flavor depth. Melt 1/2 cup butter in a small saucepan over low heat or in the microwave until completely liquidized—be cautious not to overheat it! Pour this melted butter into your dry mixture and stir until everything is well combined; it should resemble wet sand.
Once combined thoroughly, press the mixture firmly into an ungreased square baking dish (9×9 inches works best). Ensure it’s packed down evenly without leaving air pockets; this will help maintain the structure once cut into bars later on. Place your dish in the refrigerator while preparing the custard layer—it needs about 10-15 minutes to firm up before adding more layers.
Step 2: Make the Custard Filling
While your crust is chilling in the fridge, turn your attention to creating the custard filling for those perfectly layered Nanaimo Bars! In a medium-sized mixing bowl, whisk together 1 cup powdered sugar and 2 tablespoons vanilla pudding mix until well blended—this gives it that characteristic custardy flavor we love! Next add in your softened butter (3 tablespoons) into this mixture; using an electric mixer makes it easier but feel free to use a whisk if you prefer old-school methods.
Gradually pour in about 2 tablespoons milk while continuing to mix; be cautious not to add too much liquid at once—aim for a smooth yet thick consistency suitable for spreading over your chilled crust without running off edges! Once mixed thoroughly until fluffy (around two minutes), take out your crust from refrigeration and evenly spread this delicious filling on top using an offset spatula or knife—be gentle as you layer it atop!
Step 3: Prepare Chocolate Topping
Now let’s move on to creating that irresistible chocolate topping! Begin by breaking up your chocolate (4 ounces) into small pieces and placing them into a microwave-safe bowl alongside 2 tablespoons butter—the heat will help them melt together seamlessly! Microwave in short bursts (about 20 seconds), stirring between each round until fully melted—this prevents burning!
After achieving smoothness without lumps or burn spots emerge aesthetic quality—a crucial aspect when impressing guests—take care while pouring over freshly layered custard filling evenly distributing across all edges ensuring complete coverage so every bite packs chocolaty goodness! Once again place back into fridge allowing everything time needed (at least one hour) for all three layers set properly before slicing!
Serving and Storing Tips
Serving Suggestions
When ready to serve your delectable Nanaimo Bars after chilling completely—it’s time for presentation! Take them out from their cold environment carefully cutting them into squares or rectangles based on personal preference! Serve these sweet delights on colorful plates or tiered cake stands enhancing visual appeal during gatherings or events making them even more enticing! Consider garnishing each piece lightly dusted powdered sugar atop adding elegance while enhancing flavor profile too!
Pairing suggestions include coffee or tea which complements sweetness perfectly making each bite burst forth fulfilling all cravings plus providing warmth alongside decadent enjoyment throughout social occasions helping create lasting memories around delicious food experiences shared amongst loved ones!
Storage Guidelines
To store any leftover Nanaimo Bars effectively place them inside an airtight container lined with parchment paper separating layers if necessary preventing sticking issues occurring during storage duration! Refrigerate promptly where they can stay fresh last up-to five days maintaining quality flavorful textures without losing charm overtime due proper sealing measures employed within container setups chosen!
If needing longer-term storage freezer options exist too just remember wrap individual portions tightly using plastic wrap before transferring entire batch containers designed specifically holding frozen foods preserving their deliciousness intact even after thawing processes occur later down line whenever indulging feels necessary again soon thereafter enjoying homemade goodness crafted artistry brought forth lovingly created kitchen spaces shared moments spent savoring treats like these amazing treats born out creativity shown throughout culinary journeys experienced daily lives filled joyfulness alongside cherished company gathered around tables sharing laughter stories rapture memories made unforgettable forevermore etched hearts minds alike always treasured fondly remembered long afterwards…
Mistakes to avoid
One common mistake when making Nanaimo Bars is not properly measuring the ingredients. Precision is crucial, especially for the crust, filling, and topping layers. If you add too much or too little of a key ingredient, it can affect the texture and flavor significantly. For instance, too much butter in the crust will make it overly greasy, while too little sugar in the filling can lead to a bland taste. Always use measuring cups and spoons for accuracy.
Another frequent error is overlooking the chilling time. Nanaimo Bars require adequate time in the fridge to set properly. If you cut into them too soon, you risk a messy presentation with layers that haven’t firmed up. Ideally, let the bars chill for at least 2-4 hours after assembling them. This waiting period allows all the flavors to meld together beautifully while ensuring each layer holds its shape when served.
Using subpar quality chocolate can also ruin your Nanaimo Bars. The chocolate topping should be rich and flavorful, enhancing the overall dessert experience. Opt for high-quality dark chocolate or semi-sweet chocolate chips rather than generic brands that may lack depth in flavor. Additionally, tempering your chocolate properly before pouring it over the bars ensures a smooth finish.
A final mistake to avoid is skimping on flavoring ingredients such as vanilla extract or cocoa powder. These ingredients add depth to each layer of your Nanaimo Bars. When using cocoa powder for the crust or filling, ensure it’s of good quality; otherwise, you might end up with a powdery taste instead of a rich chocolatey experience.
Tips and tricks
To achieve perfect Nanaimo Bars, always let your butter come to room temperature before mixing it with other ingredients. Softened butter incorporates more easily into mixtures and helps create a smoother filling texture.
When preparing the graham cracker crust, consider adding finely chopped nuts or shredded coconut for extra texture and flavor. Walnuts or pecans work well as they provide a nice crunch that complements the creaminess of the filling. Coconut adds a subtle tropical sweetness that pairs beautifully with chocolate.
Ensure you mix the filling thoroughly until it is smooth and creamy before spreading it over the crust layer. A hand mixer works wonders in achieving that desired consistency without lumps. If you’re feeling adventurous, consider adding different extracts like almond or hazelnut for an exciting twist on traditional flavors.
For an aesthetically pleasing presentation, use a sharp knife dipped in hot water to cut your chilled Nanaimo Bars into squares or rectangles cleanly. Wipe off any excess moisture after dipping before slicing through the layers; this technique prevents messy edges and keeps each piece looking professional.
Lastly, store any leftover Nanaimo Bars in an airtight container in the fridge for optimal freshness.
Suggestions for Nanaimo Bars
When making Nanaimo Bars at home, consider experimenting with flavored fillings beyond traditional vanilla custard. For example, you could incorporate lemon zest into your filling for a refreshing citrus twist that balances out the sweetness of other layers beautifully.
You might also try using different types of chocolate for your topping layer; white chocolate adds a lovely contrast against darker fillings while offering additional sweetness that some may prefer over classic dark options.
If you’re looking for healthier alternatives without sacrificing flavor in your Nanaimo Bars, consider substituting some ingredients with organic versions or using natural sweeteners like honey or maple syrup instead of refined sugar. This way, you can enjoy these delightful treats guilt-free!
Incorporating seasonal ingredients can elevate your Nanaimo Bars even further—think pumpkin puree during autumn months or peppermint extract around winter holidays! These simple adjustments keep things interesting throughout various seasons while allowing you to showcase your creativity in baking.
Finally, if you’re hosting a gathering or party, consider making mini versions of Nanaimo Bars by cutting them into bite-sized pieces after they have set completely; these make great finger foods and allow guests to sample different treats without feeling overwhelmed by larger portions.
FAQs
What are Nanaimo Bars?
Nanaimo Bars are no-bake dessert bars originating from Canada’s west coast city of Nanaimo in British Columbia. They consist of three distinct layers: a crumbly bottom layer made from crushed graham crackers and cocoa powder; a custard-flavored middle layer that features buttercream mixed with vanilla pudding; and finally topped with rich melted chocolate which brings everything together beautifully! Each bite offers delightful textures ranging from crunchy to creamy—making them irresistible sweets loved by many!
How long do I need to chill my Nanaimo Bars?
Chilling time is essential for proper setting when preparing Nanaimo Bars! After assembling all three layers within an appropriately sized pan (usually 8×8 inches), it’s recommended that you refrigerate them for at least 2-4 hours before slicing into squares or rectangles! This allows sufficient time for flavors to meld while ensuring each layer holds its shape when cut—resulting in perfectly presented desserts every time!
Can I make substitutions in my Nanaimo Bar recipe?
Absolutely! Many ingredient substitutions work well within recipes—such as swapping out graham crackers with crushed digestive biscuits if desired!
How should I store leftover Nanaimo Bars?
After enjoying fresh-made treats like these delectable delights called “Nanaimos,” storing leftovers properly ensures prolonged freshness! Can I freeze my Nanaimo Bars?
Yes! If you’d like longer-lasting enjoyment from homemade batches then freezing is an excellent option available here too!
What variations exist for classic recipes?
There are countless variations available when creating unique spins on classic recipes featuring “Nanaimos!” Incorporate seasonal flavors like pumpkin spice during fall months—adding specific spices enhances richness while bringing warmth throughout chilly seasons! Alternatively consider adding colorful toppings such as sprinkles atop melted chocolates topping layer alongside drizzling caramel sauce around edges creating visually appealing presentations sure impress guests!
Conclusion
Making delicious Nanaimo Bars at home requires attention to detail and following some key tips outlined above. Avoid common mistakes such as improper measurement of ingredients and neglecting chilling times; both are vital steps toward achieving perfect results every time you bake these delectable treats! Experimentation is encouraged through various substitutions or additions that lend themselves well towards personalizing flavors—whether it’s infusing seasonal elements or trying new extracts!
With practice patience anyone can master art crafting stunning variations signature creations named after beautiful city known affectionately as “Nanaimo.” May every batch result inspire creativity spark joy whenever shared enjoyed savored throughout special gatherings occasions life brings our way!
Print
Nanaimo Bars
Ingredients
- 1 cup butter, softened, divided
- 5 tablespoons unsweetened cocoa powder
- ¼ cup white sugar
- 1 egg, beaten
- 1 ¾ cups graham cracker crumbs
- 1 cup flaked coconut
- ½ cup finely chopped almonds (Optional)
- 3 tablespoons heavy cream
- 2 tablespoons custard powder
- 2 cups confectioners’ sugar
- 4 (1 ounce) squares semisweet baking chocolate
- 2 teaspoons butter
Instructions
Preparation
Chocolate-coconut base:
- Use a food processer to blend the biscuits into a power, and melt the butter.
- Mix together and add in the sugar, flaked almonds, coconut and cocoa.
- Lay out a bottomless square baking pan (20cm x 20cm) on top of a Silpat sheet and line with baking paper.
- Spread the mixture out over the base of the pan and store in the fridge while you make the custard.
Custard layer:
- Whip the butter with the icing sugar and gradually add in the chilled creme fraiche.
- Pour into the pan and return to the fridge.
Chocolate ganache:
- Melt the chocolate and the butter together, then pour over the cream layer.
- Smooth out and chill in the fridge for at least 1 hour.
- Gently remove from the pan and cut into 10 equal pieces.