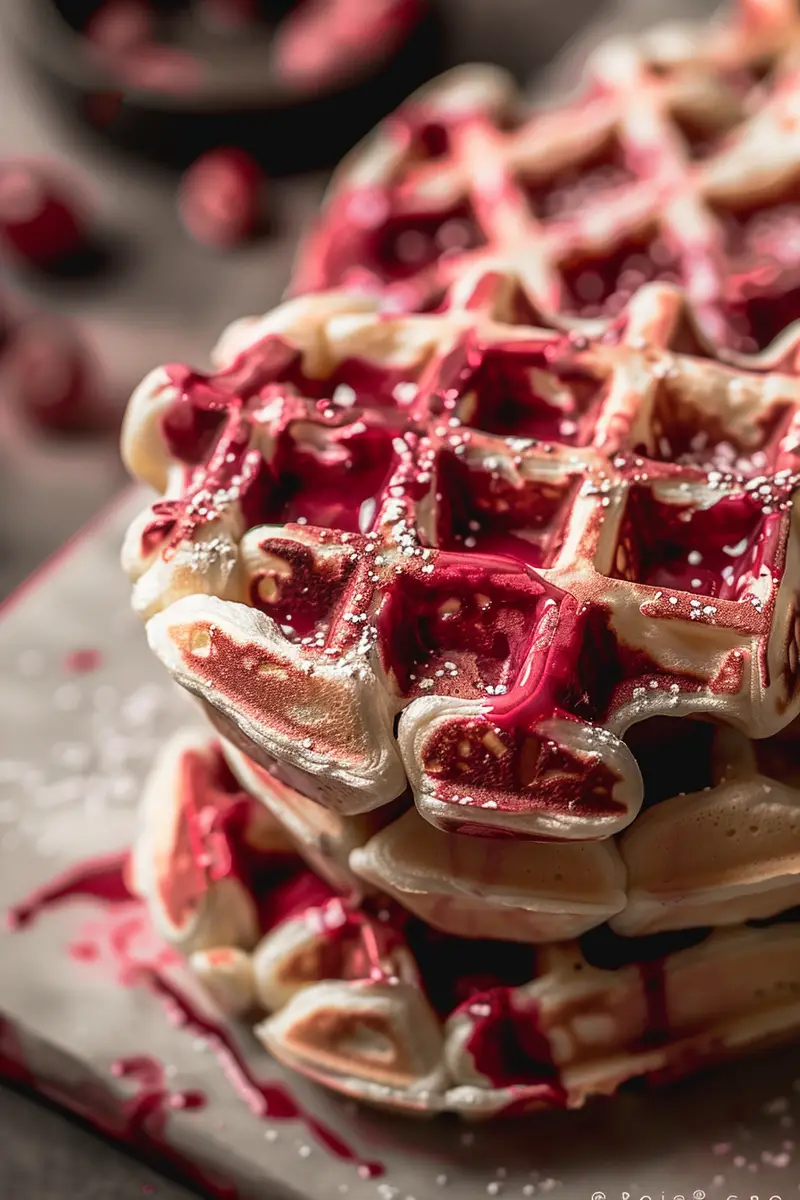
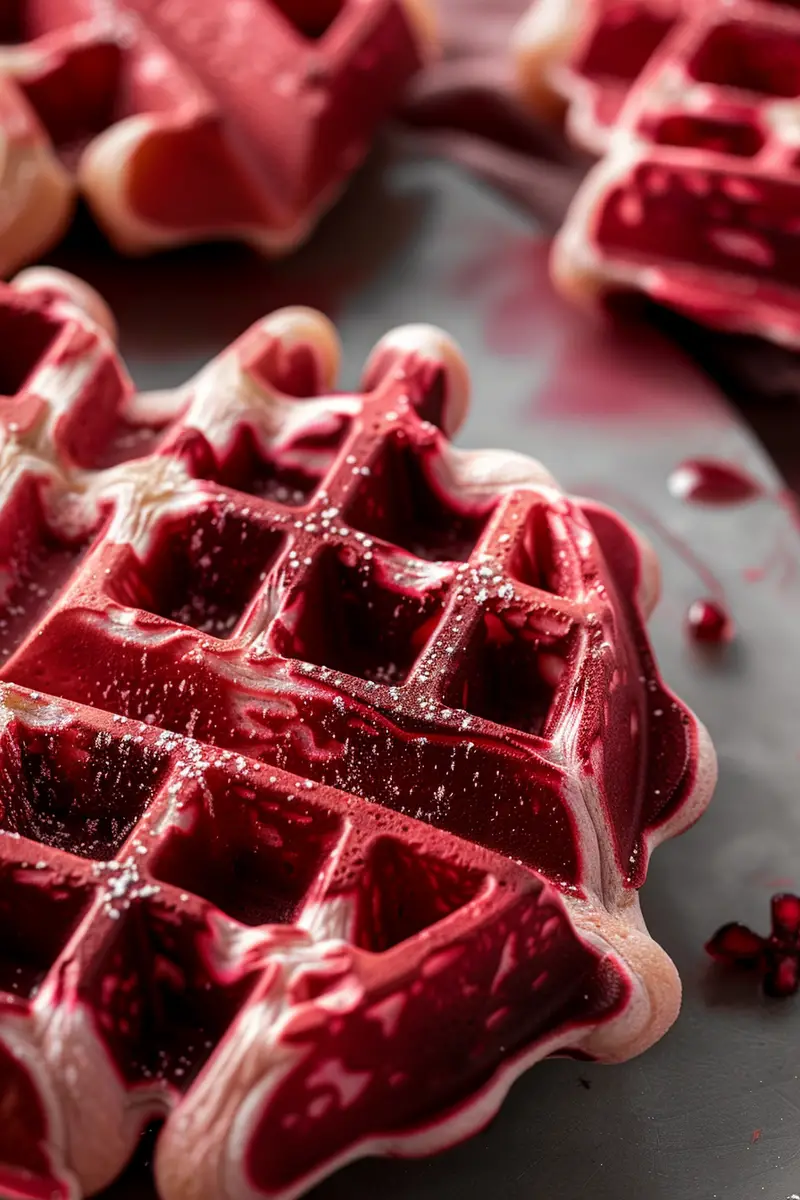
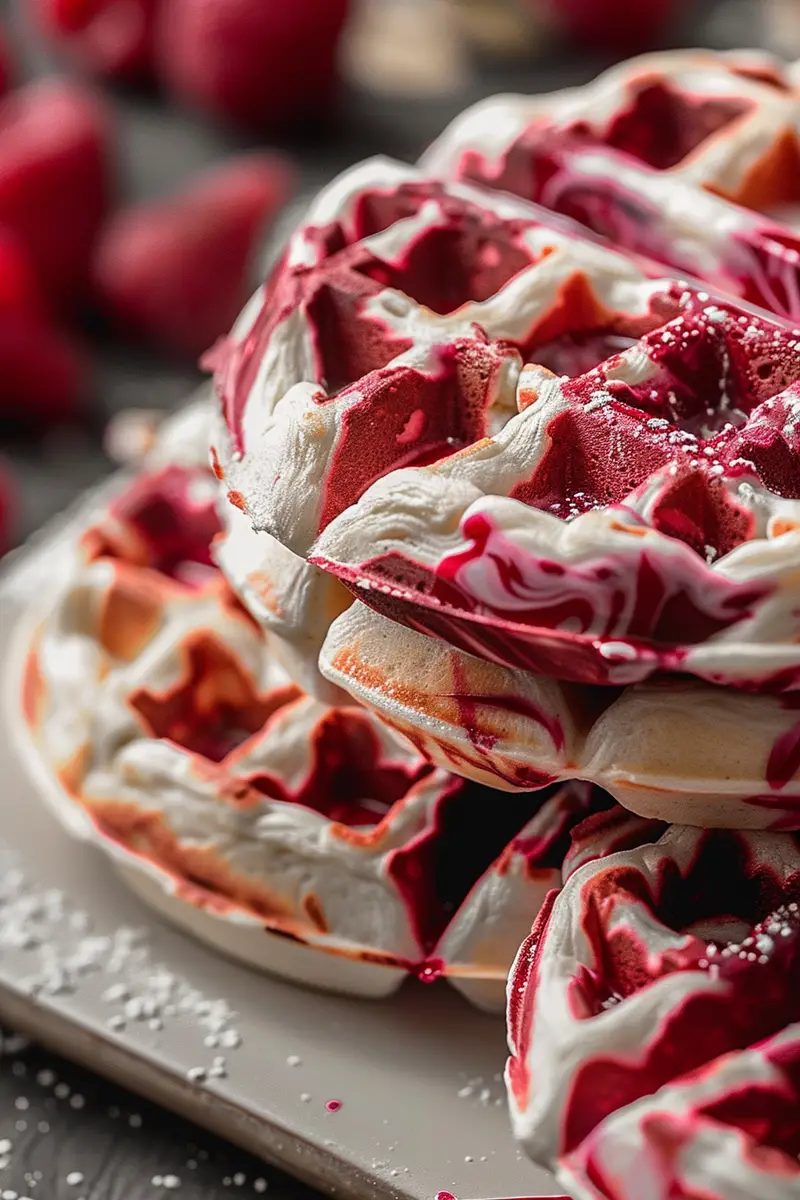
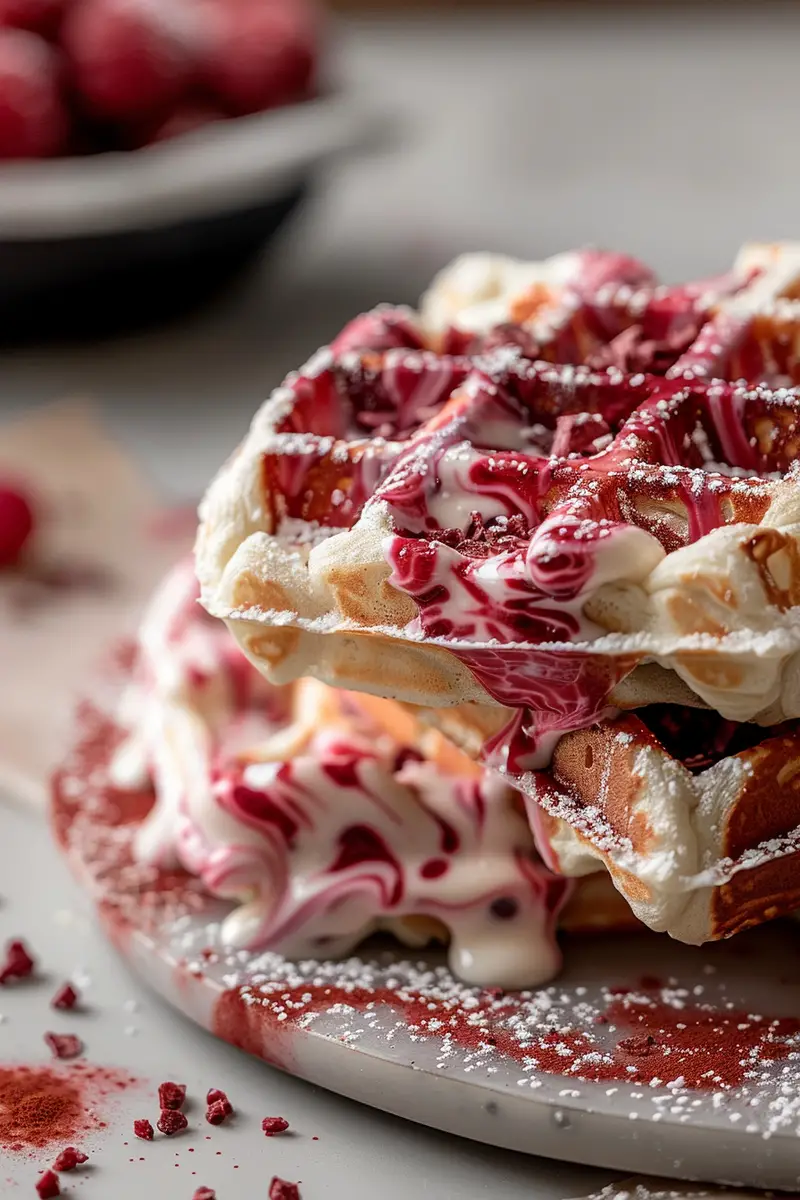
Red Velvet Marble Waffles are a delightful twist on a classic breakfast favorite. These visually stunning waffles not only satisfy your sweet tooth but also bring a festive flair to your brunch table. The rich flavor of cocoa blends beautifully with the signature red hue of the batter, creating an eye-catching marbled effect that’s sure to impress family and friends alike. Imagine serving these soft and fluffy waffles topped with a drizzle of cream cheese glaze or a dollop of whipped cream; they are perfect for special occasions or lazy weekend breakfasts.
This recipe is not only simple but also allows for customization based on your personal preferences. You can experiment with toppings such as fresh berries or chocolate chips to add even more flavors. In this article, we will guide you through the main ingredients needed for this delicious dish, followed by detailed preparation steps to ensure you achieve waffle perfection. Whether you’re an experienced cook or trying out a new recipe for the first time, our step-by-step instructions will help you create these beautiful Red Velvet Marble Waffles effortlessly. Get ready to elevate your breakfast game!
Main Ingredients
All-Purpose Flour
All-purpose flour serves as the foundation of our waffle batter. It provides structure and helps the waffles rise while maintaining a light texture. You will need 2 cups of all-purpose flour for this recipe. When measuring flour, ensure you spoon it into the measuring cup and level it off with a knife for accuracy.
Cocoa Powder
Cocoa powder adds a rich chocolate flavor that beautifully complements the sweetness of the red velvet base. For this recipe, use 1/4 cup of unsweetened cocoa powder. Be sure to select high-quality cocoa powder for the best results; it can make a significant difference in flavor.
Baking Powder
Baking powder is crucial for achieving that perfect fluffy texture in your waffles. You will need 1 tablespoon of baking powder for this recipe. This ingredient helps the batter rise as it cooks, creating light and airy waffles that are simply irresistible.
Granulated Sugar
Granulated sugar enhances the sweetness of your batter while aiding in browning during cooking. For our Red Velvet Marble Waffles, use 1/2 cup of granulated sugar. To adjust sweetness levels according to your preference, feel free to reduce or increase this amount slightly.
Buttermilk
Buttermilk adds moisture and tanginess to the waffle batter while also reacting with baking soda to create lift and fluffiness. Use 1 3/4 cups of buttermilk in this recipe; if you don’t have buttermilk on hand, you can make a substitute by combining regular milk with vinegar or lemon juice.
Eggs
Eggs provide richness and bind all ingredients together in our waffle batter. You will require 2 large eggs for this recipe. Make sure they are at room temperature before using them; this ensures better emulsification when mixing with other ingredients.
Vegetable Oil
Vegetable oil keeps your waffles moist and tender without adding too much flavor. You’ll need 1/4 cup of vegetable oil for this recipe; alternatives like melted butter or coconut oil can be used if desired.
Red Food Coloring
Red food coloring gives these waffles their signature hue, making them visually appealing and festive! You’ll need about 2 tablespoons of liquid red food coloring to achieve that vibrant color in your batter.
How to Prepare Red Velvet Marble Waffles
Step 1: Prepare Your Batter
Start by gathering all your ingredients together in one place so that you can easily access them during preparation. In a large mixing bowl, whisk together the dry ingredients: all-purpose flour, unsweetened cocoa powder, baking powder, and granulated sugar until well combined. This ensures even distribution of each ingredient throughout your batter.
In another bowl, mix together wet ingredients: buttermilk, eggs (beaten), vegetable oil, and liquid red food coloring until smooth and homogenous in consistency. It’s important to blend these wet ingredients thoroughly because they provide moisture and flavor essential for achieving perfect waffle texture.
Once both mixtures are ready, pour the wet mixture into the dry mixture gradually while stirring gently with a spatula or wooden spoon until just combined—being careful not to overmix as it may lead to tougher waffles rather than fluffy ones!
Step 2: Preheat Your Waffle Iron
While preparing your batter is essential; preheating your waffle iron is equally crucial! Set it according to manufacturer instructions—most require medium-high heat settings which allow proper cooking without burning or sticking issues later on.
Lightly grease both sides of the waffle iron with non-stick cooking spray or brush lightly with melted butter before pouring any batter inside—it prevents sticking while creating beautifully golden brown exteriors! Allowing sufficient time for preheating avoids soggy results from undercooked interiors that sometimes occur due lack thereof preparation timing!
Step 3: Cook Your Waffles
Now comes the exciting part—cooking those delicious Red Velvet Marble Waffles! Start by pouring about 1/2 cup (or according size specifications) into one side of your preheated waffle iron evenly distributing evenly across surface area (leaving some space around edges may help prevent overflow).
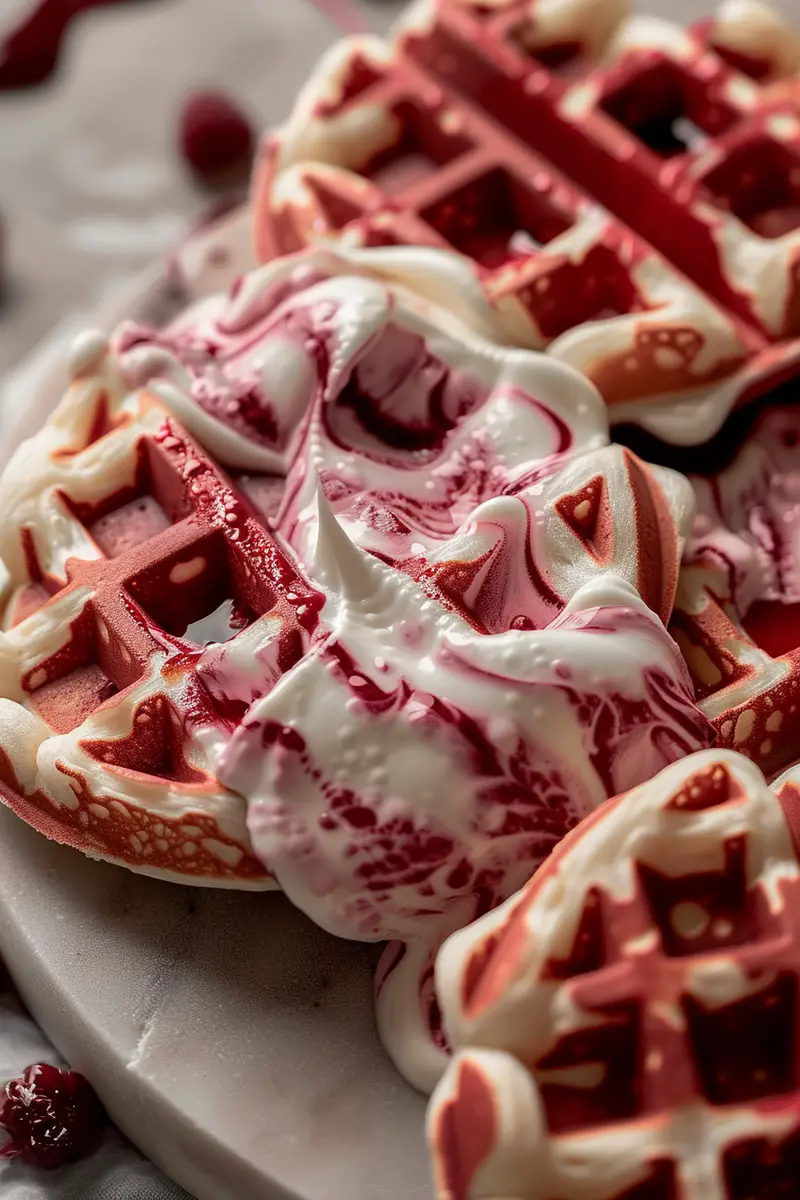
Next step involves creating that beautiful marbled effect: take half of remaining uncolored white vanilla-flavored batter from previous bowl then dollop small spoonfuls onto top surface area already filled earlier before carefully closing lid down gently pressing down slightly ensuring even contact across both layers present within appliance!
Cook according manufacturer instructions typically ranging between 3-5 minutes depending upon desired crispness level achieved golden brown appearance achieved (visualize transformation happening right before eyes!). Once complete open lid gently remove finished product using silicone spatula (avoid metal utensils which could scratch surfaces).
Step 4: Repeat Until Done
Continue repeating steps until all batter has been transformed into luscious stacked high towers ready serve guests! Depending upon number servings planned ahead might yield anywhere between eight ten deliciously decadent treats awaiting taste buds pleasure momentarily thereafter—keep warm oven low setting whilst preparing others maintain heat consistency throughout entire meal course experience!
Serving and Storing Tips
Serving Suggestions
When serving your Red Velvet Marble Waffles, consider elevating their presentation by adding toppings such as whipped cream or cream cheese frosting drizzled generously over each stack—this enhances flavor profile immensely while providing extra indulgence factor guests appreciate immensely! Fresh fruits like strawberries blueberries make delightful garnishes alongside nuts sprinkle add crunchiness contrasting softness within bites consumed eagerly thereafter too!
For added flair consider pairing these delectable creations alongside hot beverages like coffee tea match perfectly sweet treats enjoyed leisurely morning gatherings afternoon brunches alike! Don’t forget offer maple syrup side guests customize sweetness levels tailored towards individual preference ease enjoyment further enhancing overall experience shared among loved ones gathered around table together savoring moments created therein!
Storing Leftovers
If you’re lucky enough to have leftovers after enjoying these delightful waffles (although unlikely!), store them properly so they retain freshness longer period possible without compromising quality maintained throughout journey ahead! Allow cooled completely then place layers parchment paper between each individual waffle preventing sticking together keep crispy texture intact when reheated subsequently later down road enjoy again anytime desired!
Store wrapped tightly airtight container refrigerator up five days maximum although best consumed fresh day made feel free freeze batches if longer storage needed—simply thaw overnight refrigerator reheat toaster oven prior serving get back original crispy goodness restored once again delightfully serve hungry appetites awaiting satisfaction derived from every bite taken moment shared cherished forevermore!
Mistakes to avoid
When making Red Velvet Marble Waffles, avoiding common mistakes can elevate your dish from good to great. One common error is neglecting the proper measurement of ingredients. Precision in measuring flour, sugar, and cocoa powder is vital. Too much flour may lead to dry waffles, while too little can result in soggy ones. Always use the scoop and level method for accurate measurements.
Another mistake is not properly preheating the waffle iron. If you add batter to a cold iron, the waffles won’t cook evenly, resulting in a chewy texture instead of a crispy one. Preheat your waffle maker as per the manufacturer’s instructions to achieve that perfect crunch.
Mixing the batter too vigorously can also ruin your Red Velvet Marble Waffles. Overmixing develops gluten, leading to rubbery waffles instead of light and fluffy ones. Gently fold the wet and dry ingredients until just combined, allowing some lumps for better texture.
Incorporating colors unevenly is yet another pitfall. To achieve that beautiful marbled effect, alternate spoonfuls of red velvet and plain batter in the waffle iron without blending them too much. This ensures visually stunning waffles.
Lastly, don’t skip the toppings! A simple dusting of powdered sugar or a drizzle of cream cheese glaze enhances both flavor and presentation. Failing to garnish your waffles may leave them looking plain and uninviting.
Tips and tricks
To perfect your Red Velvet Marble Waffles, consider these tips and tricks that can make a significant difference in your results. First, always use high-quality cocoa powder for rich flavor. Unsweetened cocoa will provide depth without adding unnecessary sweetness, enhancing the overall taste profile of your waffles.
Experimenting with buttermilk instead of regular milk can add a delightful tanginess that complements the sweetness of the waffles beautifully. Buttermilk reacts with baking soda to create fluffier waffles, so don’t overlook this crucial ingredient.
For those who love an extra kick of flavor, consider adding vanilla extract or almond extract to your batter. These extracts complement chocolate flavors well and can elevate your dish significantly without overpowering it.
Pay attention to cooking time; overcooking can lead to dry waffles while undercooking leaves them mushy inside. Refer to your waffle maker’s guidelines for optimal cooking times but start checking a minute or two before it indicates readiness.
Finally, let your waffles rest for a minute after cooking before serving them. This allows steam to escape and helps maintain their crispness when served hot.
Suggestions for Red Velvet Marble Waffles
When preparing Red Velvet Marble Waffles, several suggestions can enhance both taste and presentation. Pairing these delightful waffles with fresh fruits like strawberries or raspberries not only adds freshness but also balances out their richness with natural acidity.
Another suggestion is to incorporate nuts into your batter for added texture and flavor depth. Chopped pecans or walnuts work wonderfully against the soft fluffiness of the waffle while contributing healthy fats.
For an indulgent twist, consider serving your waffles with whipped cream or ice cream on top. This can turn breakfast into a dessert experience that family and friends will rave about long after they are finished eating.
Drizzling homemade maple syrup or flavored syrups such as caramel or hazelnut brings an exciting element to each bite. It might just become everyone’s favorite part!
Lastly, consider preparing a batch ahead of time if you’re hosting guests or planning for meal prep throughout the week. You can freeze cooked waffles and reheat them in a toaster for quick breakfasts without sacrificing quality.
FAQs
What are Red Velvet Marble Waffles?
Red Velvet Marble Waffles are a delicious variation of traditional waffles made with red velvet cake batter swirled together with a classic vanilla or chocolate batter. This creates an eye-catching marble effect that is both visually appealing and tasty.
How do I ensure my Red Velvet Marble Waffles turn out fluffy?
To achieve fluffy Red Velvet Marble Waffles, utilize buttermilk in place of regular milk as well as avoid overmixing the batter once wet ingredients are added to dry ingredients; this keeps gluten formation at bay for lighter results.
Can I make Red Velvet Marble Waffles ahead of time?
Yes! You can prepare Red Velvet Marble Waffles ahead by cooking them in batches and freezing them individually wrapped in plastic wrap or parchment paper. To reheat, simply pop them in a toaster until warm and crispy again.
What are some topping ideas for Red Velvet Marble Waffles?
Popular toppings include whipped cream, fresh berries like strawberries or blueberries, maple syrup, chocolate sauce, or even cream cheese glaze which perfectly complements their red velvet flavor profile!
Can I substitute ingredients for dietary restrictions?
Certainly! To make these waffles gluten-free, use almond flour or gluten-free all-purpose flour; substitute dairy milk with almond milk or coconut milk for lactose-free options while ensuring other ingredient proportions remain balanced.
How do I store leftovers?
Store leftover Red Velvet Marble Waffles in an airtight container in the fridge for up to three days. For longer storage options, freeze cooked waffles wrapped tightly; they will last up to three months when frozen properly!
Conclusion
In conclusion, mastering Red Velvet Marble Waffles involves understanding key techniques while avoiding common mistakes that could compromise quality. Accurate measurements ensure consistency; preheating equipment guarantees perfect texture; gentle mixing preserves fluffiness; creating beautiful marbling elevates visual appeal; garnishing enhances presentation—all essential elements detailed above contribute significantly towards creating delicious results worth sharing.
Remember that tips like using high-quality ingredients such as cocoa powder and buttermilk not only enhance flavor but also affect overall success during preparation stages! Don’t hesitate to try various topping combinations—whipped cream paired with fresh fruit adds delightful contrast against rich flavors found within each bite!
Finally—be adventurous! Experimentation leads you closer toward discovering personal preferences which ultimately shape unique culinary experiences around this delightful recipe! Happy cooking!
Print
Delightful Red Velvet Marble Waffles Recipe
Ingredients
- 1 cup all-purpose flour
- 2 tablespoons granulated sugar
- 1 tablespoon baking powder
- 1/4 teaspoon salt
- 1 egg
- 3/4 cup milk
- 1/4 cup unsalted butter, melted
- 1 teaspoon vanilla extract
For the Red Velvet Batter
- 1 cup all-purpose flour
- 2 tablespoons cocoa powder
- 1/4 cup granulated sugar
- 1 tablespoon baking powder
- 1/4 teaspoon salt
- 1 egg
- 3/4 cup buttermilk
- 1/4 cup unsalted butter, melted
- 1 teaspoon vanilla extract
- 2 tablespoons red food coloring
For the Cream Cheese Glaze [optional]
- 4 ounces cream cheese, softened
- 1/2 cup powdered sugar
- 1–2 tablespoons milk
- 1/2 teaspoon vanilla extract
Instructions
- Prepare the classic waffle batter by mixing the dry ingredients in one bowl and the wet ingredients in another. Combine both, stirring until just mixed.
- For the red velvet batter, repeat the process, adding cocoa powder to the dry ingredients and red food coloring to the wet.
- Preheat your waffle iron according to the manufacturer’s instructions.
- Pour the classic batter and red velvet batter alternately onto the waffle iron, then use a skewer to gently swirl the batters together, creating a marble effect.
- Cook according to your waffle iron’s instructions, usually about 5 minutes, until the waffles are golden and cooked through.
- For the cream cheese glaze, beat together cream cheese, powdered sugar, milk, and vanilla until smooth.
- Serve the waffles hot, drizzled with cream cheese glaze and accompanied by fresh berries if desired.